React-native Appsync S3 Video Upload Example App
Complete Guide to AWS Amplify and React Native
Let'southward Build an Due east-commerce App with ReactNative and Amplify
Click here to see the video walkthrough.
Table of Content
- Introduction
- Setting Upward the Project
- Adding Cognito Hallmark
- Adding AppSync API
- Adding S3 Storage
- Retrieving AppSync Data
- Conclusion
ane. Introduction
Howdy! & Welcome to this complete guide on AWS Amplify and React Native. In this tutorial, we will build a simple e-commerce app. Users can log in/signup to this app. Users can add their own products, and all the users tin view those products added past different users.
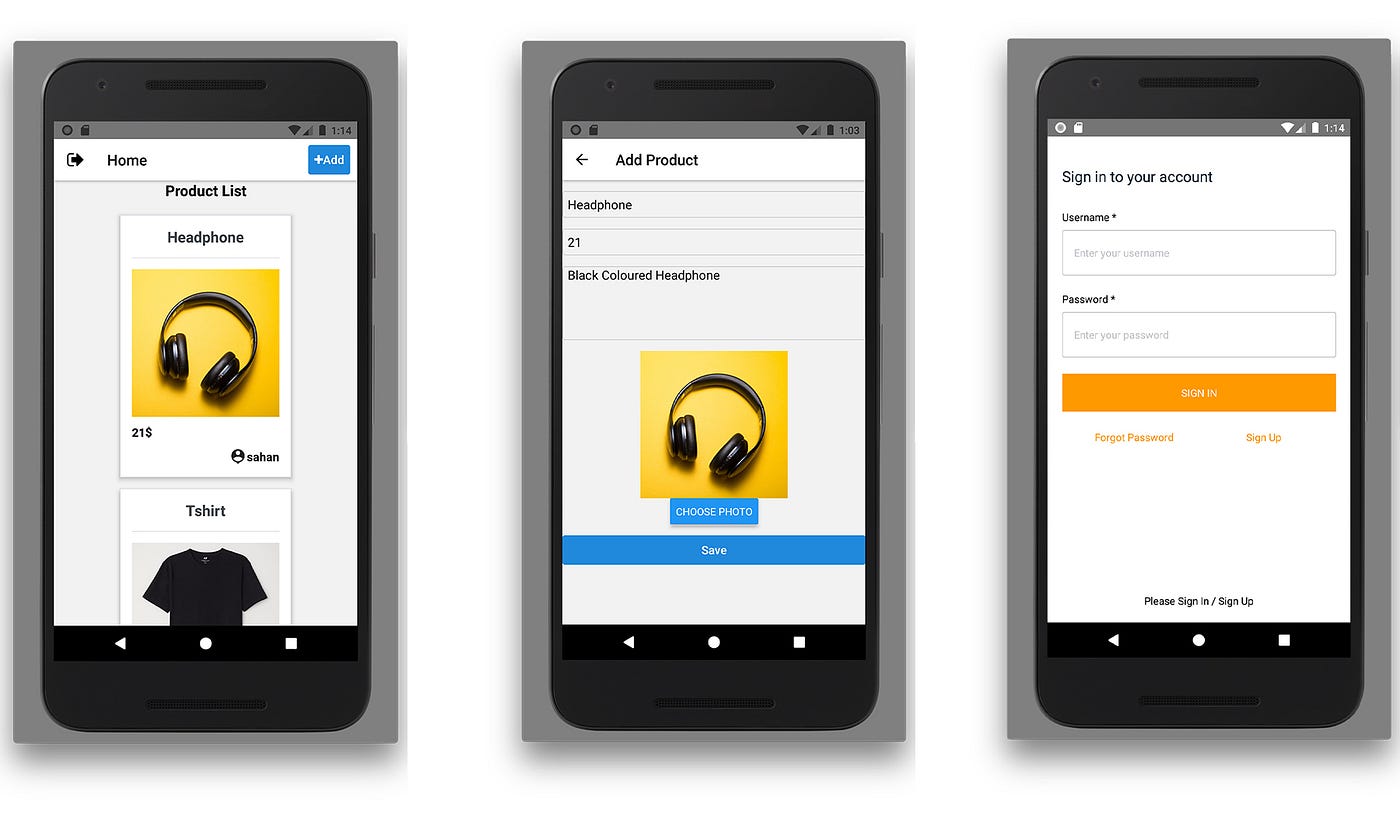
Here is a quick demo,
Fifty-fifty though this is non a very complex application, this volition be a perfect starter project for you. We will utilize different AWS Services similar S3 Storage, AWS AppSync API, and Amazon Cognito Authentication. Don't worry I volition explicate these in particular, later.
Architecture Diagram
The following diagram demonstrates our AWS Architecture Diagram.
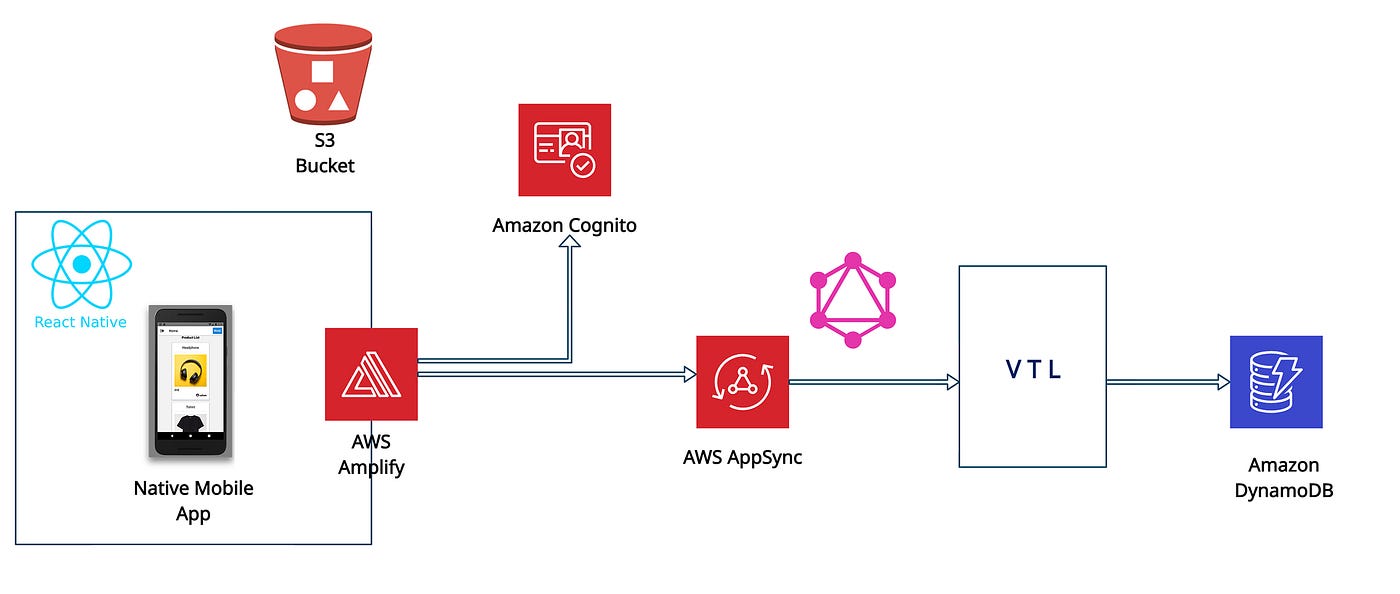
AWS Amplify makes information technology much easier to work with these different services. As always, our backend resource volition be created and managed by Amplify. Let me explain what these services will do.
So, Amplify is the centre of our backend surroundings. Those arrows pointing from Amplify mean that nosotros volition use Amplify to connect those dissimilar resources. Every product volition accept an image. We will store that image in an S3 Saucepan. Production details will be saved in Amazon DynamoDB, a NoSQL database provided by AWS. To talk with that Database, we will use a GraphQL API provided by AWS AppSync. Amazon Cognito will handle hallmark.
Ready to build the app? Let'due south go started. 👷🏽♂️🧰
Prerequisites
To avoid any disturbances in the hereafter, brand certain you have the following prerequisites installed.
- Node.js v10.ten or after
- npm v5.ten or later
- Amplify CLI (version @four.twoscore.i, what I'm using in the tutorial)
- Android Studio
- ReactNatice CLI (version 2.0.1)
2. Setting Up the Projection
Installing and Configuring Amplify CLI
Through this tutorial, we volition work with AWS Dilate CLI. You can install it by running,
npm install -g @aws-amplify/cli@4.39.0 Then y'all demand to run amplify configure. This volition set up your Amplify CLI. There you will set up a new IAM User. You will finish setting upwardly your IAM User, past providing the accessKeyId and secretAccessKey for your IAM user.
If you are stuck at some point, you can refer to this original guideline on installing Amplify CLI, https://docs.amplify.aws/cli/starting time/install
Creating a New ReactNative Awarding
Hope y'all have installed and configured Amplify CLI.
To work with ReactNative, y'all will have to set up the Android development environment. You lot can refer to this original guide, https://reactnative.dev/docs/environs-setup
Let'due south create a new React Native app called AmplifyShop.
npx react-native init amplify_shop If yous have already installed react-native-cli, you can utilise that instead of npx.
Open the newly created React Native Project using Android Studio. Open the Android Emulator using Android Studio'due south AVD Manager. In the projection directory, run these ii commands.
          npx react-native start
npx react-native run-android
At present, the React Native project should run on your Android Emulator. If you are stuck at some point, delight refer to the guide that I have suggested earlier.
Initializing Dilate Backend
Let's initialize Amplify for our project. Then we tin add services one by one.
In the project directory, run
amplify init Then you will be prompted for the post-obit information regarding the projection you initialize.
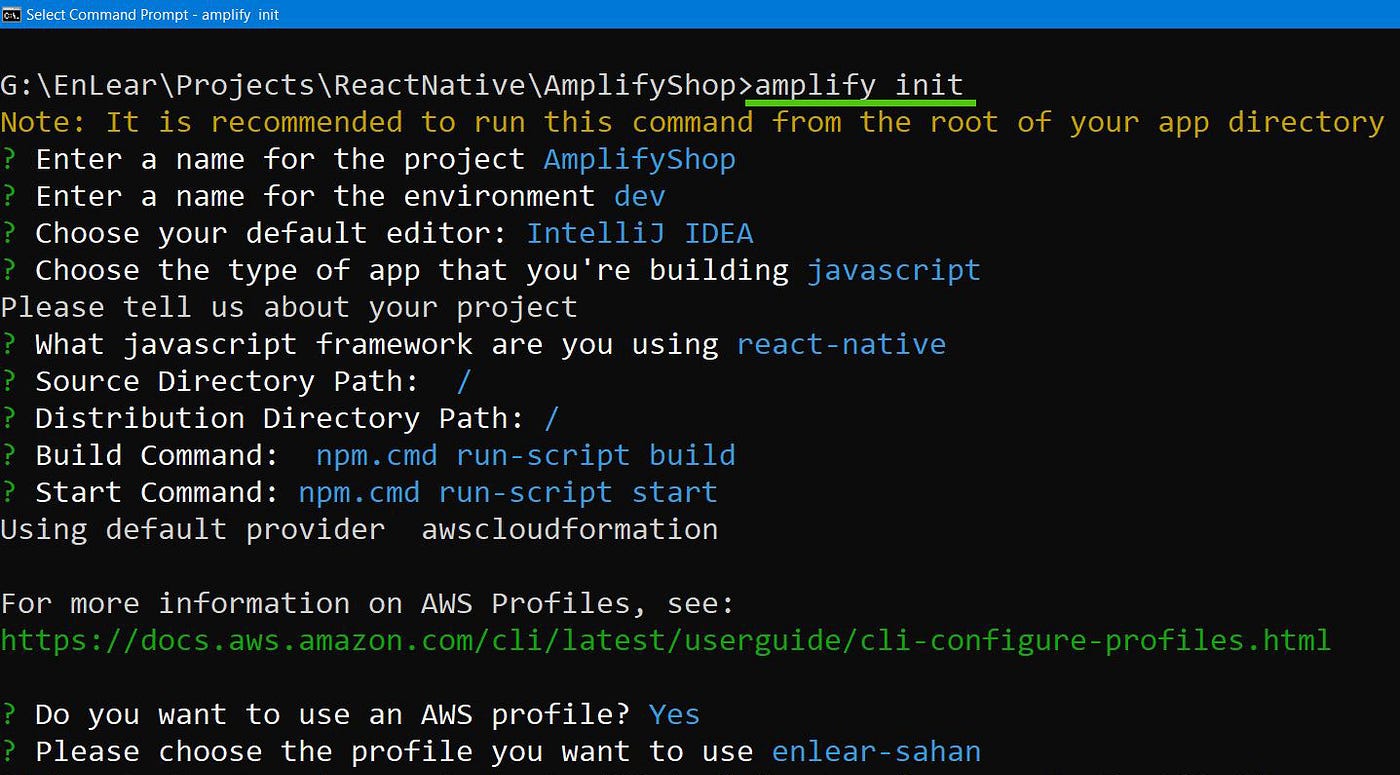
When you initialize your Amplify Projection,
- It creates a file called
aws-exports.jsin the src directory. This file will shop all the relevant information to identify the AWS resource/services that will allocate in the future. - It creates a directory called
amplify. We will employ this directory to store the templates and configuration details of the services that we will utilise in the future. In this directory, Amplify will hold our backend schema as well. - It creates a Cloud Project. That projection tin can be viewed using the
amplify consolecommand.
Side by side, we need to install all the necessary dependencies by running the following control.
npm install aws-amplify aws-amplify-react-native amazon-cognito-identity-js @react-native-community/netinfo You lot will also demand to install the pod dependencies for iOS.
npx pod-install Configuring Amplify Backend
To complete setting upwards our Amplify project, nosotros need to configure amplify in a higher-order component. Adding the following lines of code in your App.js or index.js file will practice the job.
          import Amplify from 'aws-amplify';
import awsconfig from './aws-exports';          Amplify.configure({
            ...awsconfig,
            Analytics: {
            disabled: true,
            },
});
That completes setting up the project. Now allow'due south add those services 1 by one.
3. Adding Cognito Authentication
Now, adding Authentication to your React Native App never gets easier than Dilate.
Adding Sign-upward and Log-in
Run amplify add auth in your project directory. Submit the following information when configuring Hallmark.
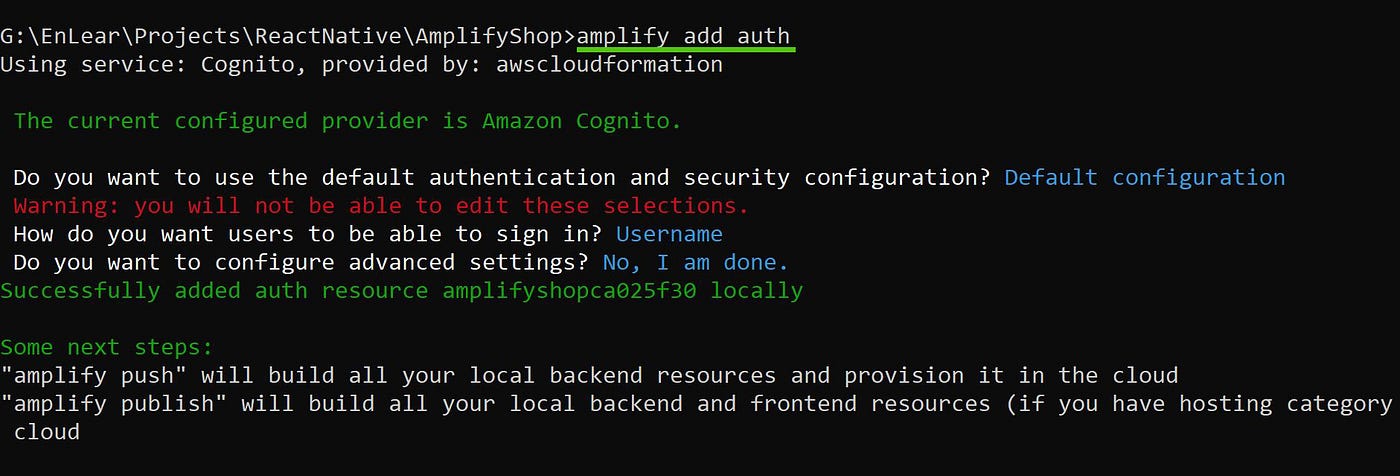
And then, run dilate button, to deploy your backend changes. Amplify will take intendance of the residual by creating your Cognito Userpool.
The authentication UI component, provided by Amplify Framework, will provide the entire authentication flow.
In the App.js file,
- Import
withAuthenticatorcomponent
import { withAuthenticator } from 'aws-amplify-react-native' - Wrap the main component with
withAuthenticatorcomponent.
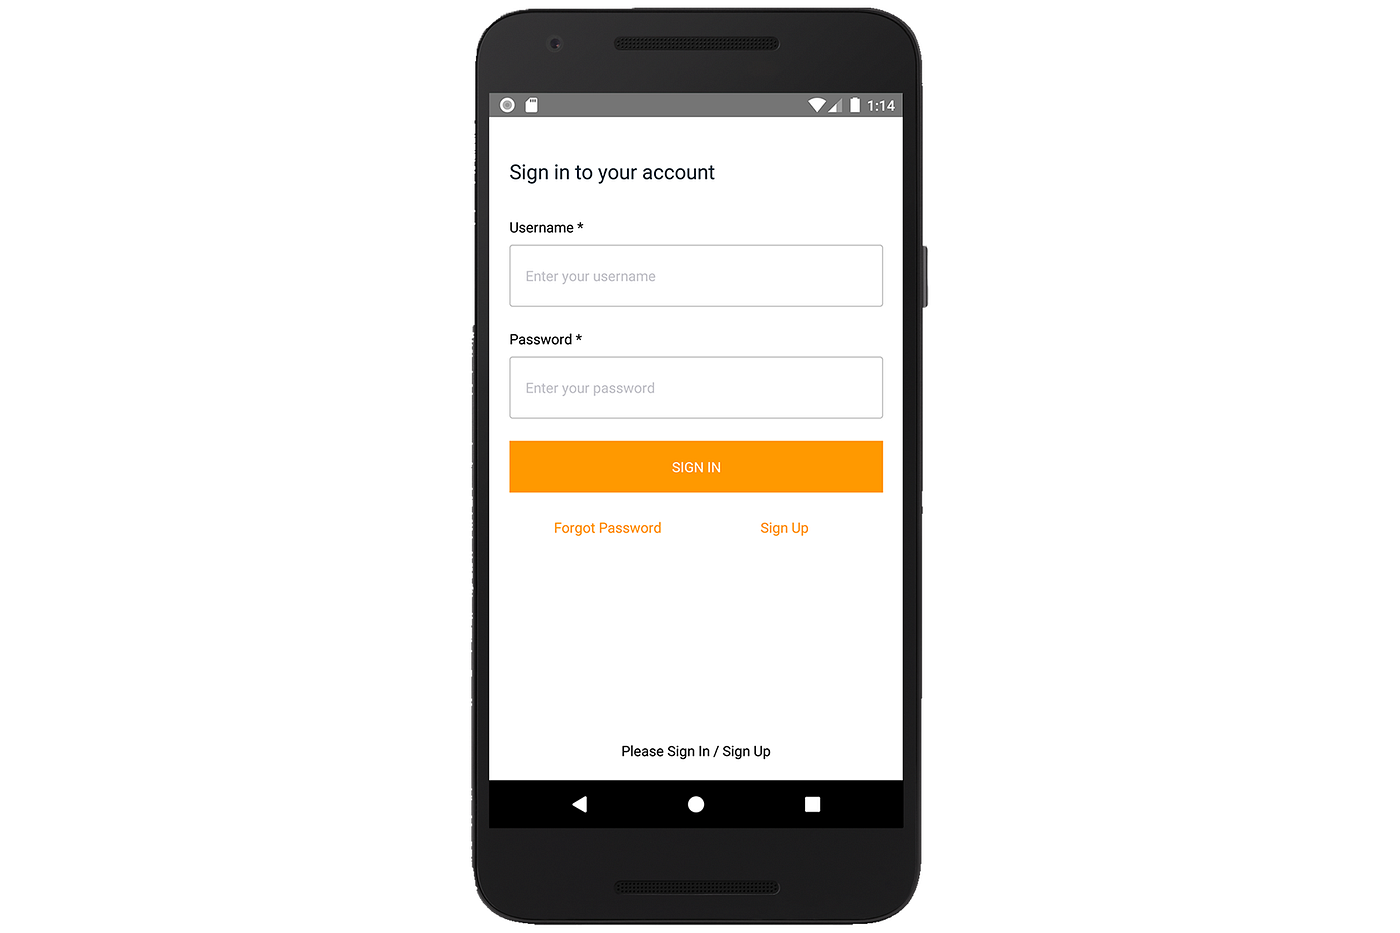
export default withAuthenticator(App) When you run your app. This login screen volition evidence upward. Try logging in as a new user. This will lead you lot to the home page. The newly created user volition be saved in our Cognito User Pool.
Before Adding AppSync API, let's add together navigation to our App.
Adding ReactNative Navigation
Our App will contain two screens. One Screen to display the list of products and the other to add together new products. Let's create these 2 screens.
Create a new directory chosen src. In that directory, create a folder called screens. In that binder src/screens, create ii new javascript files named add-production-screen.js and home-screen.js I just prefer this naming convention. You can use any convention.
Copy and paste the following sample code. Do change the function name ('HomeScreen' and 'AddProductScreen') and the title according to the page.
directory: src/screens/ home.js, add-product-screen.js
There are multiple ways to add navigation into ReactNative Apps. In this tutorial, nosotros will use 'Stack Navigator Library' from React Navigation. Showtime, nosotros should install it using npm.
npm install @react-navigation/native Install all the additional tertiary-political party dependencies as well.
npm install react-native-reanimated react-native-gesture-handler react-native-screens react-native-safe-area-context @react-native-community/masked-view @react-navigation/stack From React Native 0.60 and higher, linking is automatic. So you don't need to run react-native link.
If you're on a Mac and developing for iOS, you need to install the pods (via Cocoapods) to complete the linking.
npx pod-install ios To terminate installing React Native Navigation, add the following import in your App.js or index.js file.
import 'react-native-gesture-handler'; For the sake of this tutorial, I will use ii additional styling libraries. I will use react-native-elements and react-native-vector-icons. Allow'due south install those using npm.
          npm install react-native-elements
npm install react-native-vector-icons
In order to view fontawesome icons, we need to add the following line into android/app/build.gradle file.
apply from: "../../node_modules/react-native-vector-icons/fonts.gradle" With that out of the mode, move into the App.js file. We will use the App.js file to gear up navigation in our App. Replace the current lawmaking with the following.
directory: App.js
This is the simplest and easiest way to add navigation. We got Stack.Navigator Component, which we can provide an initial route. Within that wrapper component, we can ascertain each screen using the Stack.Screen component.
We can utilize that options prop to define the header for each screen. I just added a navigation button on the right side of our header. Information technology should navigate to our AddProduct Screen.
Since we are using Stack Navigation, the new screen gets loaded on height of the previous screen. Therefore, the dorsum button volition exist added automatically.
Calculation Sign-Out Option
How about adding a sign-out option to our Domicile Screen. Nosotros are already passing headerRight to our habitation screen. We can pass another prop called headerLeft. This volition create a new push on the left side of our header.
Do paste in the post-obit code along with the import.
          // importing Auth Grade from Dilate Library
import {Auth} from 'aws-amplify';
headerLeft: () => (
            <View way={styles.logOutBtn}>
            <Button
            icon={<Icon name="sign-out" size={25} color="#000000" />}
            onPress={}
            type="clear"
            />
            </View>
),
Sign-out button volition trigger, Auth.signOut() method. This method will end the user'southward login session. When the session is over, the login-screen gets loaded automatically. We don't need to manage any state variable. Amplify will do the authentication session handling.
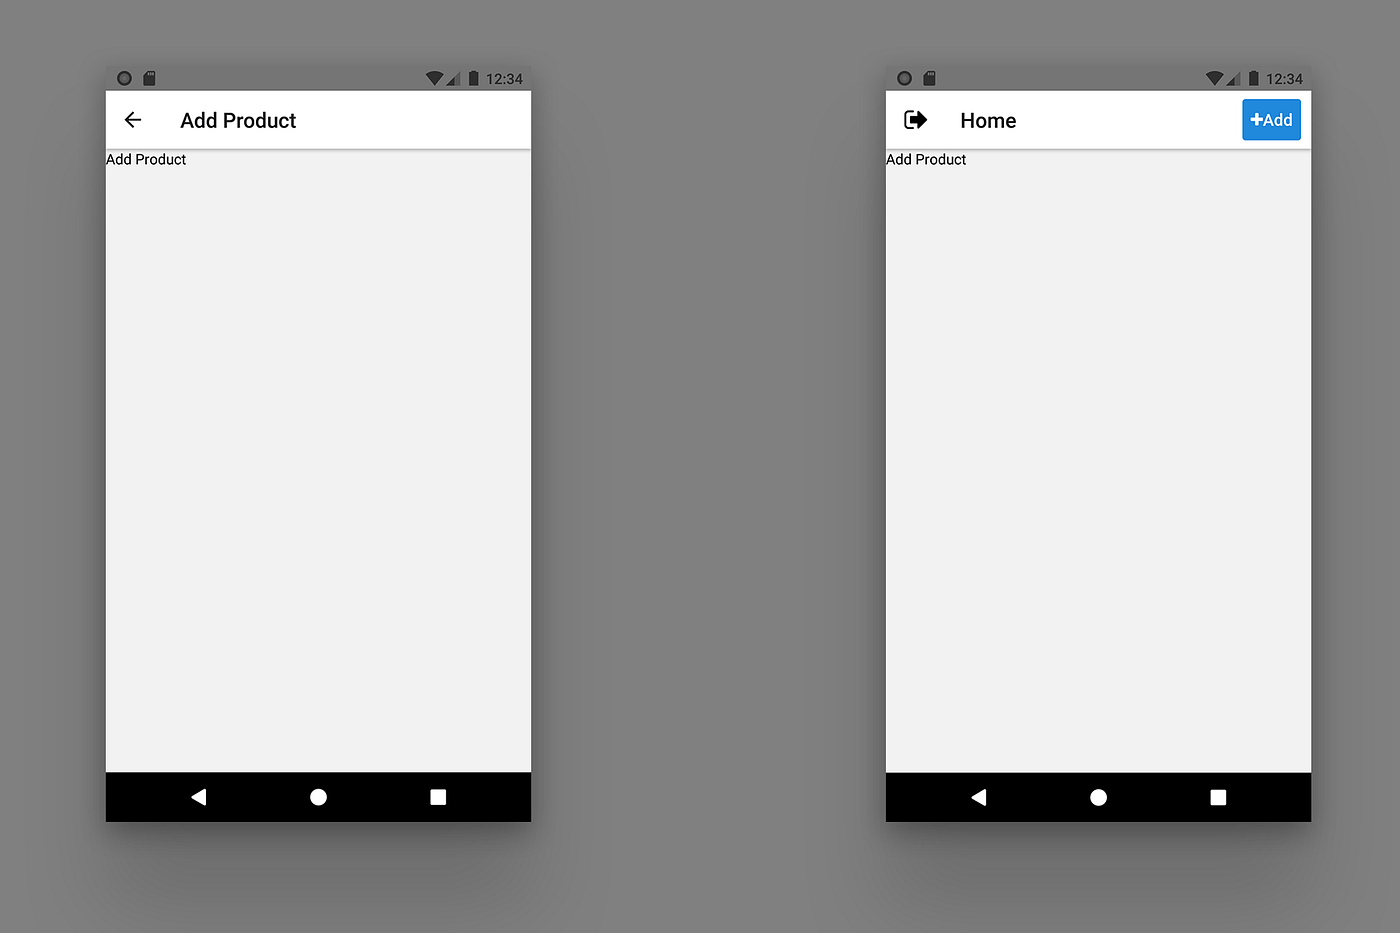
And so, that's information technology for Navigation. Larn more about React Native Navigation here. In the finish, the outcome should exist something like this.
four. Adding AppSync API
Permit's shop details almost products past adding an AppSync API. We will relieve details well-nigh products such every bit name, price, and description. We will also add an image to every product. Let's go along that image option for later.
Executing 'amplify add together api'
Every bit I've said earlier, through AppSync, we can build a GraphQL API. All the heavy lifting, such equally connecting and creating DynamoDB tables, generation queries, and mutations, will be done by AppSync.
Let'southward started by provisioning an AppSync API for our Amplify Backend. Execute,
amplify add api and you lot will be prompted for the following information.
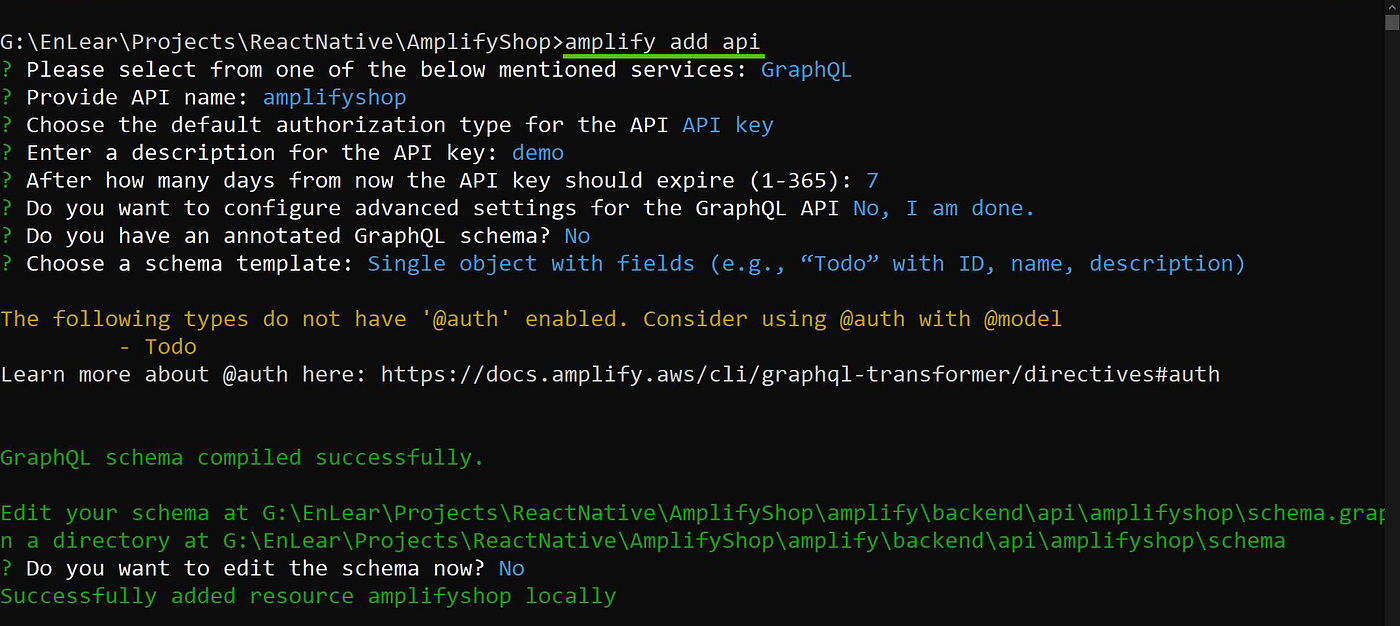
Simply have the defaults.
Editing GraphQL Schema
Let's edit our schema. You will find our schema.graphql file in dilate/backend/api/schema.graphql directory. Copy and paste the following schema.
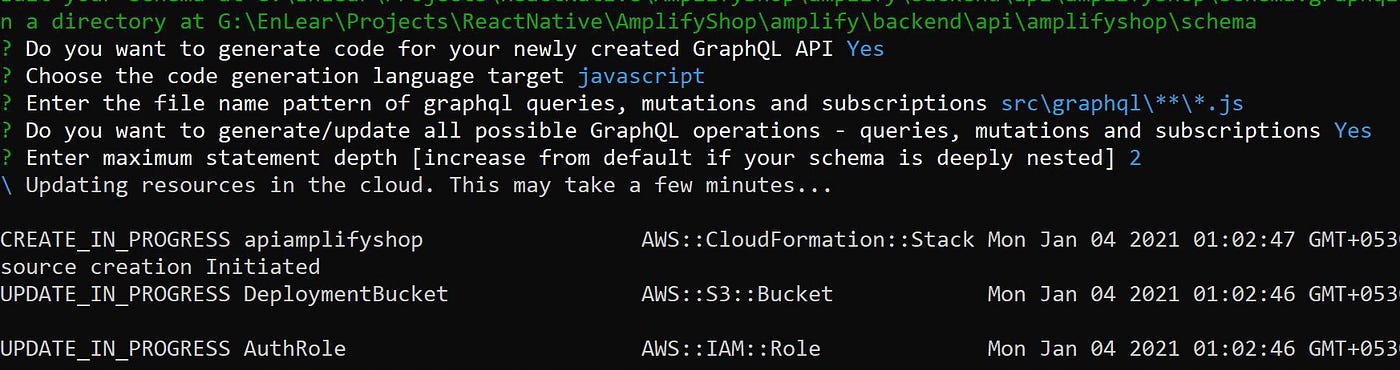
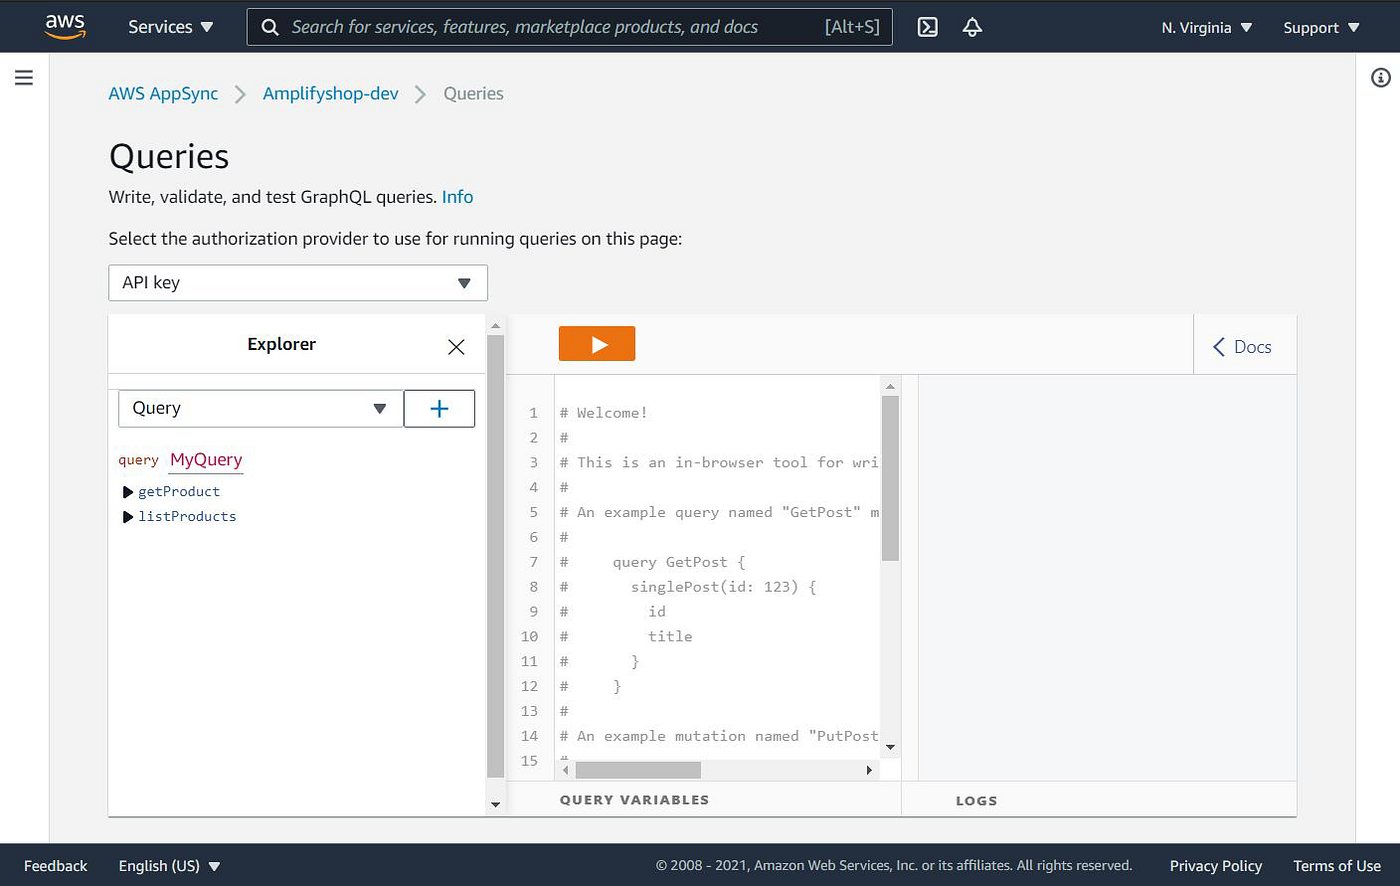
Now, our AppSync API has been created. Besides, the AppSync Library automatically created queries, mutations for our GraphQL Schema. Run dilate api console to view your AppSync API in AWS.
Yous could play around with some GraphQL operations in this AWS AppSync Console.
Adding AddProduct Screen
Allow's start interacting with our AppSync API.
Before that, I want to add an extra package that will help in creating a React Native Class. With the tcomb-form-native packet, you lot tin speedily create a grade on the fly. Then, let's install it using npm.
npm install tcomb-form-native Copy and paste the following lawmaking into our add-product-screen.js file.
directory: src/screens/add-production-screen.js
Try running your app, you lot should see a grade. Now, let's inspect our lawmaking.
You can see that, I didn't use whatever textInputs. I merely divers our fields using t.struct and just since the description is a multiple textInput, we need to pass in extra options.
In our handleSubmit role, we are saving entered details in the database. Paste in the following code within our handleSubmit function. Don't forget the imports.
Auth.currentAuthenticatedUser() will do exactly what the name suggests. It will return details about the logged-in user. Cognito gives every user an attribute chosen sub, a unique cord value. We will save that as the userId assigned to a product. The username volition showcase the product owner.
The createProduct mutation was generated automatically. Here we are referring to that mutation, which was defined in graphql/mutations.js file.
Now, later on running the app and saving a product, you should see a console.log of the response. You lot could also query in the AWS AppSync Console.
5. Adding S3 Storage
Now past far, users tin can save product details. Nosotros should likewise add an actress option to upload a production image. We will need an S3 Bucket to store production images. Working with S3 really gets easier with Dilate. Permit me show you.
Before that, install the React Native epitome picker library.
npm install react-native-image-picker RN >= 0.threescore
cd ios && pod installRN < 0.lx
react-native link react-native-image-picker
For now, this epitome picker library will support simply 21 or newer SDK Versions. So edit minSDK version in android/build.gradle file.
buildToolsVersion = "29.0.two"
minSdkVersion = 21
compileSdkVersion = 29
targetSdkVersion = 29
Executing 'amplify add storage'
Run,
amplify add storage to create a new S3 Bucket. Accept the defaults in the prompt.
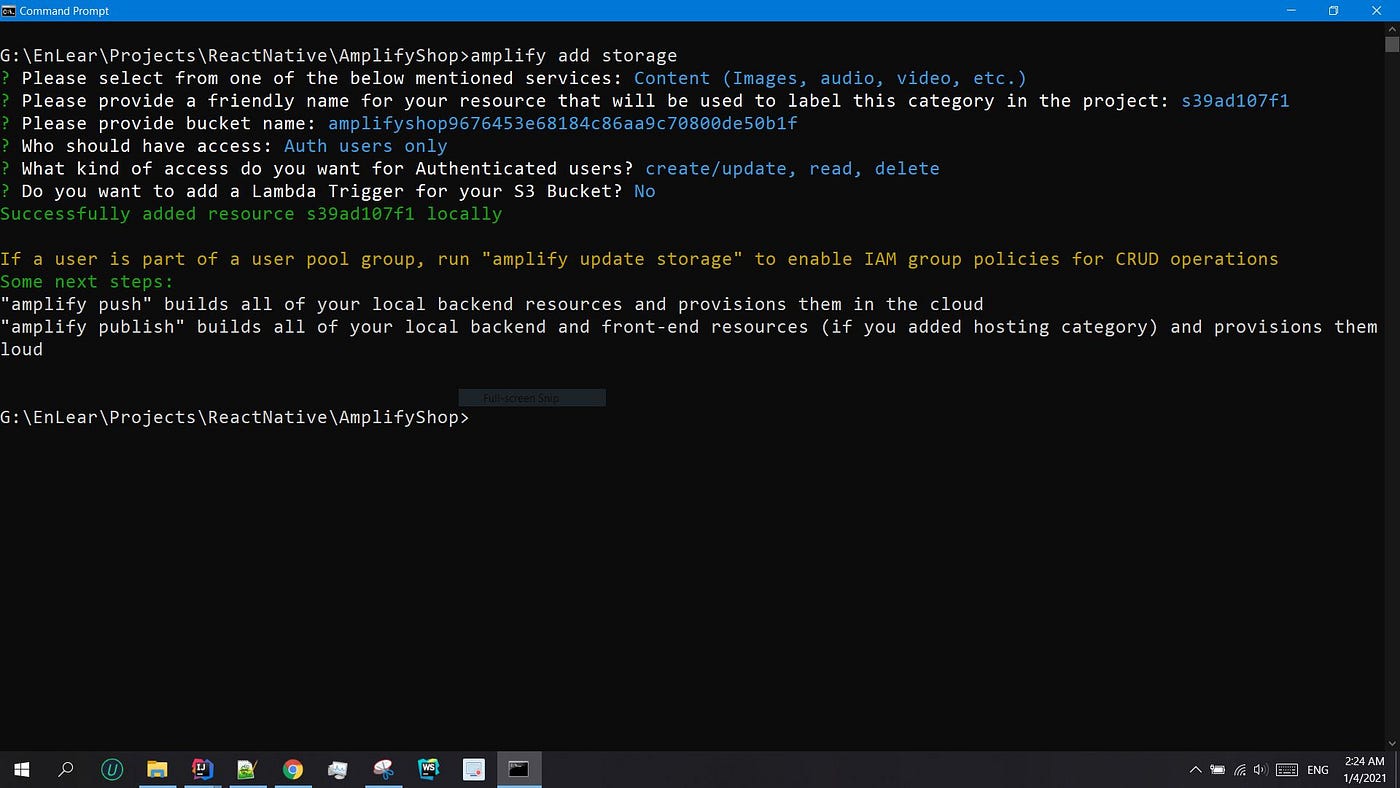
Run amplify button, to deploy your changes.
Updating the Form
Let's add image uploading and previewing options into our class. I build a fancy ImageUploader Component with an image preview. Make sure to add that by making a new components directory in the src folder.
directory: src/components/ImageUploader.js
In social club to use this image uploading option, we will make the following changes in our add-product-screen.js file.
Nosotros will add the extra ImageUploader Component inside our ScrollView Component.
          return (
            <>
            <SafeAreaView fashion={styles.addProductView}>
            <ScrollView>
            <Form
            ref={(c) => setForm(c)}
            value={initialValues}
            blazon={User}
            options={options}
            />
            <ImageUploader photo={photo} handleChoosePhoto={handleChoosePhoto} />
            <Push button title="Save" onPress={handleSubmit} />
            </ScrollView>
            </SafeAreaView>
            </>
);
Declare this land variable along with the new handleChoosePhoto function.
If nosotros don't ready initial values, launching the image library volition reset the form. Don't forget to add these imports too.
import {launchImageLibrary} from 'react-native-image-picker';
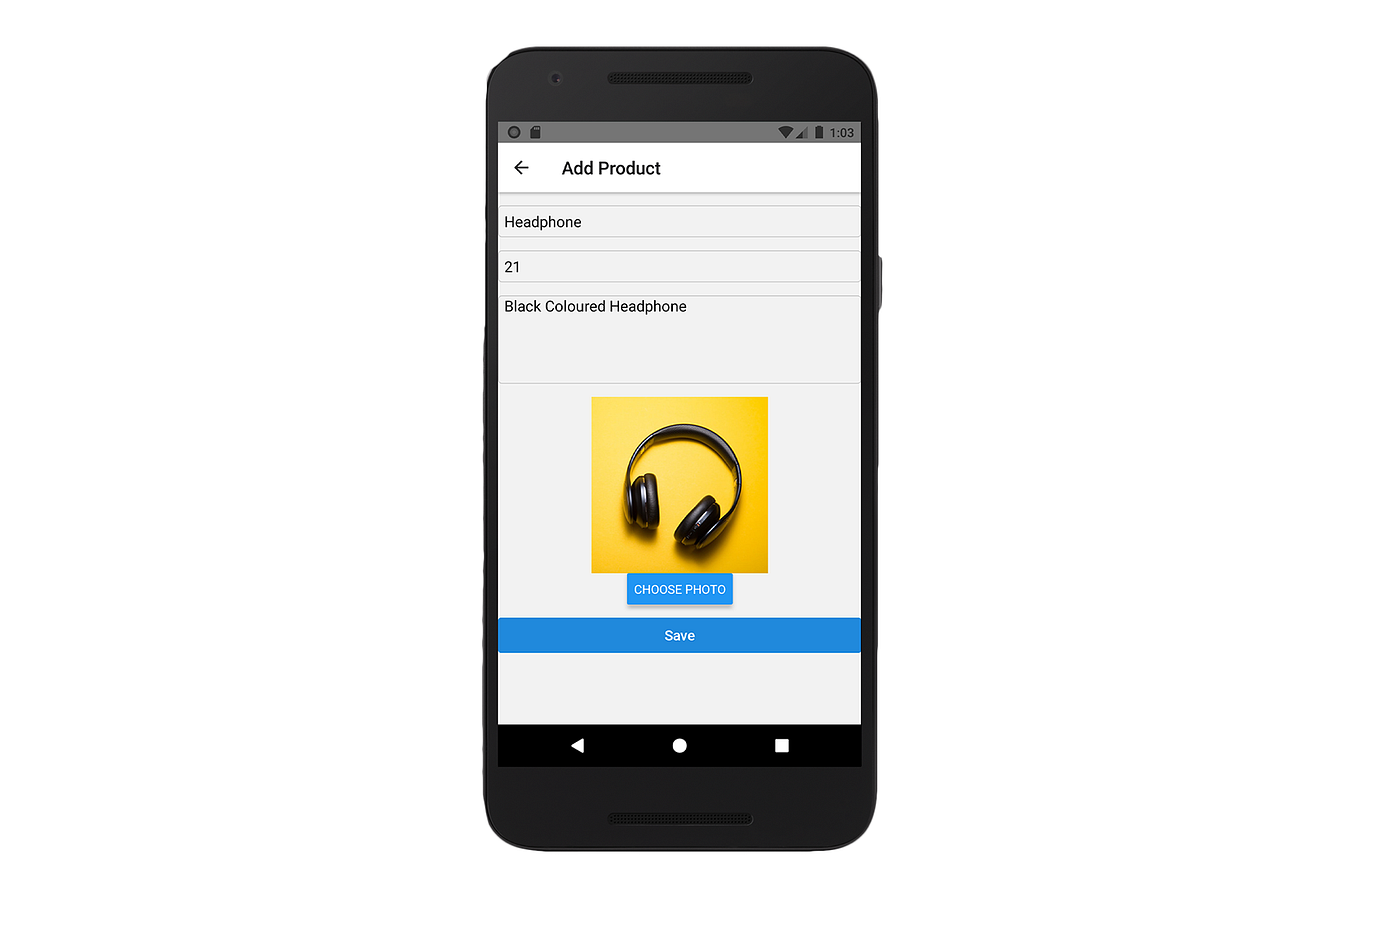
import {Storage} from 'aws-amplify'; You tin can do a test run of the form. You should run across something like this.
Also, we should update our handleSubmit function.
We tin can upload an S3 Image into our bucket using Storage.put method, provided by AWS Amplify Library. We need our file name (image key in S3 ) to admission our file again. Then we will store that in our database.
Try uploading a new image. Submit the form. Wait until the image uploads. You should see a console.log like this.
[Sat Jan 02 2021 01:58:21.981] LOG Response : [Sat Jan 02 2021 01:58:21.982] LOG {"information": {"createProduct": {"createdAt": "2021-01-01T20:28:22.382Z", "clarification": "Most Sahan New Product", "id": "f3188508-5ee7-4af4-acf3-3c948f61d868", "image": "6ca2947e-766b-445e-b260-0041502e652a", "proper name": "Sahan New Production", "cost": 200, "updatedAt": "2021-01-01T20:28:22.382Z", "userId": "7d5fa0a3-4d26-4354-8028-7cc597a69447", "userName": "sahan"}}}
6. Retrieving AppSync Data
Now, let's prove a Product Listing View on our home screen. For that, I have created two new components,
- ProductCard Component
directory: src/components/ProductCard.js
- ProductList Component
directory: src/components/ProductList.js
At present, let's use this ProductList Component in the Home Screen. Supervene upon the current sample code with the post-obit code.
directory: src/screens/home-screen.js
In the useEffect hook of our Dwelling Screen, nosotros are fetching all products. This time, we are running a GraphQL query listProducts, which will be divers automatically in the graphql/queries.js file.
We are passing those fetched products, into our ProductList Component. ProductList Component will render a ProductCard for each production.
In PtoductCard Component, when we pass in the epitome filename to Storage.become part, we volition get the total paradigm URL.
Try running your app, yous should at present run across your product list.

7. Conclusion
With that, we were able to complete all our functionalities successfully. How almost letting users order products? I volition save that for y'all to endeavour on 😃.
Congratulations on Completing the Tutorial! 🎉
If we recap on what we have done,
- We added Cognito Hallmark to let users log-in or sign-upward to our app.
- Additionally, nosotros included Navigation and Sign-out options.
- Nosotros created the AppSync GraphQL API, and we saved some production details in our Database.
- We created S3 Bucket to let users upload an image to each product.
- At the Home Screen, nosotros were able to evidence a product ListView to the user.
I think at present you have a skilful understanding of working with these dissimilar AWS resources in your ReactNative Apps.
I promise you have completed all the steps without running into any bug. However, if you exercise, you lot tin can ask anything in the comments section below.
Video Walkthrough related to this BlogPost:
Source: https://enlear.academy/complete-guide-to-aws-amplify-and-react-native-59e455881d4f
Postar um comentário for "React-native Appsync S3 Video Upload Example App"